


Cool Season Food Plots
Planting supplemental forages is a popular method of attracting deer. However, one must remember that food plots should not be used as a "quick-fix" nor be substituted for proper habitat management practices. Food plots can be used to supplement essential nutrients that may be lacking in native forage. They are also valuable as a tool to facilitate harvest and to increase non-hunting viewing opportunities. Regardless of the purpose, consideration must be given to each of the following to insure successful establishment:
- Site selection
- Soil analysis
- Liming and pH
- Fertilization
- Forage selection
- Planting
- Evaluation
The purpose of this article is to provide Mississippi sportsmen and landowners a guide for simply and economically establishing a complete cool season forage mixture for white-tailed deer.
Site Selection:
When choosing a site to use as a food plot, the primary consideration should be soil productivity. Productive soils are those that have adequate fertility, moisture, drainage, and texture. However, other factors such as adequate sunlight, accessibility, size, shape, and arrangement must also be considered.
A good rule of thumb is to make plots at least one acre in size, irregularly shaped, and at least 1/4 mile apart. We recommend that 3-5% of an ownership be devoted to supplemental plantings that include a diversity of cool and warm season forages.
If land ownership prevents the establishment of food plots in ideal locations, acceptable alternatives may include existing openings such as logging decks, fallow fields, utility right-of-ways, fire lanes, and logging roads. However, the establishment of supplemental forages adjacent to public roads is not recommended because of the increased potential for deer-vehicle collisions and poaching.
Soil Analysis:
Most sportsmen accept the necessity of proper fertilization for optimal forage growth of supplemental wildlife plantings, but rarely do they consider liming or soil pH. The two components, fertilization and pH, work together. Proper systemic uptake of fertilizer is diminished if soil pH is low. For example, if soil pH is around 4.5, close to 80% of the money you spent on fertilizer is wasted.
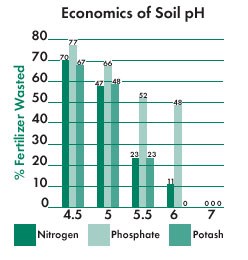
In addition, important soil nutrients such as zinc, manganese and iron are either unavailable or toxic to some plants if soil pH is not correct. Farmers have long since learned the importance of this relationship. If the wildlife manager of today desires to move up to efficiently utilizing soil and producing maximum amounts of quality forage at the most economical rates, he must learn from the successful farmer.
Begin supplemental wildlife plantings by soil sampling several months prior to planting time. The Mississippi Cooperative Extension Service is a valuable and competent source for soil sampling information, analysis, and interpretation. They can provide you with instructions, a soil sampling kit, and have samples analyzed at a cost of $3.00 each.
When you receive your soil analysis, you will be provided with specific recommendations for liming and fertilization. The time to complete pre-planning of your cool season plantings is late spring to early summer.
Liming and Soil pH:
Soil pH is a measure of the acidity or alkalinity of the soil. This measure ranges from 1 to 14, with 7 considered neutral. Any value less than 7 is categorized as acidic, while values greater than 7 are alkaline. Normally soils will not be more acidic that 3.5 or more alkaline than 10. Most soils in Mississippi, which have not been previously limed, will be moderately acidic (usually around 4.0 - 5.0) due to humid conditions and the decomposition of leaves, twigs, and other plant materials. The goal of the wildlife manager should be to achieve a soil pH of 7.0. A value of 6.7 - 7.0 will net maximum productivity, especially on legumes and, to a lesser extent, on cereal grains such as wheat and oats. Proper inoculation of legumes is more critical on acidic soils because the bacteria which aid legumes in fixing nitrogen are more limited on acidic soils.
Your soil analysis will be returned with site-specific recommendations on lime application rates. Do not be surprised if you receive a recommendation of 3 tons of lime per acre on some of your sites which have never been limed. (In the absence of soil testing, a rule of thumb for lime application is to add 2 tons per acre every third year.) You may also learn that some types of soils require more lime than others to achieve the same result. Clay soils will typically receive higher recommended lime application rates than some of the more sandy soils.
There are many different liming materials available on the market. Each of these materials will have varying efficiency ratings. The only way to be sure of what you are getting is to deal with a reputable dealer. For simplicity, we will limit our discussion to powdered and pelletized forms. The powdered form is the most economical. The typical cost per ton ranges from $30 - $50 per acre, including commercial spreading. The drawback to the powdered form is that a commercial spreader truck must be able to access the planting site. But, if access is not a problem, this would certainly be the recommended method of application. You will get the most benefit from the lime if it is applied and disked into the soil up to three months prior to planting time. Adequate soil moisture will also increase the ability of the lime to increase soil pH.
On small areas or on plantings which are inaccessible by the spreader truck, pelletized lime can be utilized. This form of lime is packaged in 50-pound bags and costs about $250 per ton. Accompanying this price is the added burden of uniformly applying the pelletized lime on the planting site. This application is normally made with a fertilizer/seeder spreader attached to a small farm tractor. Smaller electric versions of the seeder are now available as ATV attachments. The opportunities to utilize an ATV and assorted attached implements for disking, seeding, fertilizer/lime application, harrowing, herbicide application, and even culti-packing are creating situations where supplemental wildlife plantings can be incorporated in remote areas of a landowner's property.
Fertilization:
Intelligent and economical fertilization of supplemental wildlife plantings will consist of applying a specific amount of three basic elements. These elements are expressed as nitrogen (N), phosphorus (P), and potassium (K). They are usually expressed in numerical form, such as the standbys 13-13-13 and 6-8-8. In these mixtures the number is actually the percent of that particular element in the mixture. For example, in the 13-13-13 mixture, the first 13 is the percent of total nitrogen, the second 13 is the percent of available phosphorous and the third 13 is the percent of available potassium. These nutrient values can be 0, so do not be surprised to see a recommendation of a mixture such as 0-46-46 on a soil analysis form.
Local feed stores do not carry every combination of fertilizer mixtures. However, most larger dealers will custom mix almost any mixture you request. Allow them several days notice to prepare your mixture. If custom mixing is not possible, you can adjust pre-mixed combinations to fit most of your basic needs. For example, 5-10-10 supplies the same equivalent mixture as 10-20-20. But, where you would apply one ton of 5-10-10/acre you would only need to apply 1/2 ton of 10-20-20.
Additional Information:
- Legumes fix their own nitrogen and do not require nitrogen in the fertilizer mixture.
- In the absence of a soil test, "rule of thumb" fertilizer applications are available for most forage species.
Forage Selection:
Plants are most palatable and subsequently most nutritious when they are actively growing. However, as a plant matures fiber content increases and protein levels decrease. By planting different forage species with staggered maturity dates within the same food plot, the length of time that highly digestible forage is available will be increased. Combination plantings will also reduce the risk of total crop failure due to insects, disease, or adverse weather since different species grow and mature at different rates.

Planting cool season food plots with a mixture of cereal grains and clovers can provide deer with quality forage during times of nutritional stress. A cool season combination that does well in the south is a mixture of oats, wheat, crimson clover, and arrowleaf clover. Oats and wheat will germinate and grow quickly to insure quality forage is available during the hunting season. Although the clover seed will germinate, growth will be slow until late winter, when crimson clover will begin rapid growth that continues until blooming in late March to mid-April. At that point the arrowleaf clover will begin to actively grow. Arrowleaf (depending on the variety) will mature from mid-June until the first of July. Therefore, this mixture can supply quality forage on the same food plot from October through June.
To establish this mixture, the following seeding rates are recommended:
- Oats 25-30 lbs per acre
- Wheat 25-30 lbs per acre
- Crimson clover 10-12 lbs per acre
- Arrowleaf clover 4-5 lbs per acre
Planting Methods:
Seedbed preparation should begin with thorough disking of the selected site in September. The plot should then be harrowed to achieve a uniform planting surface. The seed mixture should then be thoroughly blended (after legume inoculation) and evenly broadcast over the prepared surface. After seed distribution, cover the broadcast seed by lightly harrowing. It is important to note that this mixture should not be planted any deeper than 1/2 inch for proper growth of the clover component. A culti-packer can be used at this point to help preserve existing soil moisture and to insure seed / soil contact.
Legume Inoculation:
Proper inoculation of legumes will increase forage production and ultimately reduce fertilizer cost by fixing nitrogen in the soil. Therefore, when establishing forage legumes, it is critical that seeds be inoculated with the required rhizobium bacteria (Inoculant Code O for arrowleaf; Inoculant Code R for crimson).
Legume seeds are inoculated by applying live bacteria to the seed with a sticking agent. Sticking agents serve a dual purpose by adhering the inoculant to the seed and by feeding the bacteria until the seed germinates. Although commercial sticking agents are available, a 10% sugar solution or some kind of soft drink works well. Seed should be lightly moistened with the sticking agent prior to applying the inoculant. Apply and mix the inoculant well to insure all seeds are covered . Allow the seed to air dry in order to ensure even distribution from a seeder. However, inoculated seed should be planted within 24 hours to retain viable bacteria.
Several precautions are in order when planting forage legumes. Rhizobium bacteria are very susceptible to heat and inoculant should be stored in a refrigerator until ready to plant. Inoculated seed should only be planted when soil contains sufficient moisture.
Although the seed might survive if planted on dry soil, most of the bacteria will die before the seed germinates, resulting in poor forage production. Some varieties of clover can be purchased pre-inoculated. Pre-inoculated seeds generally have a lime coating that not only protects the bacteria, but also adheres it to the seed. However, the bacteria will not remain alive for extended periods of time. Fresh seed should be purchased and stored in a cool location until planted.
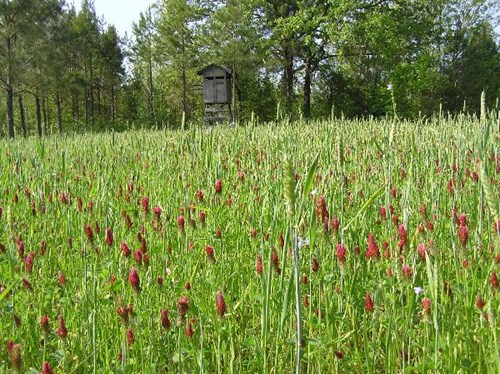
Food Plot Evaluation:
An easy and inexpensive method of determining the amount of production and utilization your food plot is getting is through the use of exclosures as shown on the front cover of this brochure. They are easily constructed out of suitable fencing material, such as 1x4 or 2x4 wire. Light gauge wire (such as chicken wire) is generally not sturdy enough to withstand adverse weather conditions and contact from foraging deer. The exclosures should be about 3 feet in diameter and 4 feet in height. As a general rule, locate one exclosure for every acre of food plot. For more information on how to build exclosure cages and food plot evaluation, read the article Exclosure Cages in Food Plots.

